Jake Vealesco is an offroader enthusiast for almost 6 years. He is mechanical engineer by profession and offroader by passion
Navigating through the process of programming a Polaris wireless winch remote doesn’t have to be a daunting task. In this detailed guide on how to program a Polaris wireless winch remote, we’ll walk you through each step with clarity and precision. From understanding your remote’s functionalities to syncing it with your winch system, we’ve got you covered.
Table of contents
How to program Polaris wireless winch remote?
Step 1: Prepare the vehicle
Park the vehicle on a flat, level surface and ensure it is in park.
Remove the key from the ignition.
Flip up the passenger seat bottom and remove the storage compartment underneath.
Disconnect the negative battery cable and set it aside.
Step 2: Access the dash compartment
Release the two quarter turn latches on the hood and pivot the hood back to remove it.
For Northstar Ultimate models, pull up on the windshield handle and open the tip-out windshield.
Remove the three fasteners securing the windshield lock mount to the dash.
Remove the two center dash trim panel rivets and slide the trim panel rearward to gain access to the main harness.
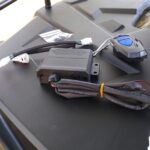
Step 3: Mount the wireless receiver
Mount the wireless receiver to the right-hand side of the under hood liner using the provided fasteners.
For models with a windshield washer reservoir, mount the receiver harness side forward.
Install the provided fasteners and torque them until fully seated.
Step 4: Route the receiver connectors
Route the receiver connectors rearward through the bulkhead grommet and into the dash compartment.
Step 5: Connect the switch and wireless receiver
Locate the pre-wired main harness connector under the dash.
Disconnect the switch connector from the main vehicle harness breakout connector.
Connect the switch connector to the wireless receiver harness.
Step 6: Connect the wireless remote
Join the wireless remote connector to the main vehicle harness breakout connector.
Step 7: Reinstall the center dash trim
Reinstall the center dash trim by aligning the front retaining tabs and sliding it forward.
Secure it with the previously removed push pin rivets.
Step 8: Reinstall the windshield lock mount and hood
For Northstar Ultimate models, reinstall the windshield lock mount and torque the fasteners until fully seated.
Lower the tip-out windshield and lock it into place.
Realign the lower retaining tabs on the hood and pivot it forward.
Secure the two quarter turn latches.
Step 9: Mount the wireless remote holder
Choose a mounting location for the wireless remote holder that does not obstruct shifting, steering components, or impact vision.
Use the holder as a template to mark the two mounting holes.
Drill the marked holes into the mounting surface, ensuring there are no existing vehicle components behind them that could be damaged.
Mount the holder using the provided fasteners and torque them until fully seated.
Step 10: Reconnect the battery and reinstall components
Reconnect the negative battery cable and torque it to specification.
Reinstall the storage compartment and passenger seat bottom.
Summary
Being well-versed in how to program a Polaris wireless winch remote is not just convenient, but also amplifies the functionality of your winching system. This guide has been curated to ensure that you have all the information at your fingertips. So, gear up, program your remote, and take control of your winch wirelessly with ease and confidence.